How To: Set up a Raspberry Pi as a DNS based Ad-Blocker + DNSSEC with Unbound
Problem:
- You, like me, do not want to see ads on your local network while browsing the internet
- You are also interested in securing your local DNS server from potential DNS spoofing / cache poisoning attacks
- You are concerned that your ISP or your upstream DNS provider (1.1.1.1, 8.8.8.8, etc…) is harvesting your DNS requests to track you or serve you “better” ads

Solution:
- First, you will definitely need some familiarity with Linux / Ubuntu / Debian and how DNS works
- Secondly, this guide is for a “headless” set up, meaning no monitor or keyboard for your Raspberry Pi are needed. Everything will be done per SSH / the command line, so you will also need Putty or another SSH client (Windows 10/11 have it built in now)
- In order to connect via SSH, the Raspberry Pi will need an IP and a way for you to connect to it, so your home router or modem will be fine as long as it has a free Ethernet port
- You will need a free static IP on your network where the Raspberry Pi will sit as the network’s DNS server, as well as external access to the internet for the Raspberry Pi at least over port 53 (TCP for DNSSEC and UDP for plain ole DNS)
- Buy a Raspberry Pi with an Ethernet port – older models are fine for your purposes as a DNS server doesn’t need much horsepower
- You will probably want a case and maybe some heat-sinks (I bought them, but I think for DNS server purposes, they are not necessary)
- You will definitely need a micro SD card as storage / “hard drive” for the device (32 GB’s is more than enough for a DNS server)
- I found a package deal for the Pi itself and all the accessories on Amazon, but I leave the shopping details up to your
- Install the Debian-based Raspbian OS
- You will need a separate Linux or Windows machine and a way to write to micro SD cards on said device
- Install Pi-Hole on your new Raspberry Pi
- Install and configure Unbound
Details (Step-by-Step):
Well, this sounds pretty straightforward, right? Just follow the guides above and you are up and running, no prob! But if you are like me and only know enough about networking and DNS to be dangerous, then I will go through the whole process step by step below, but I will leave you to your own research as to what exactly Pi-Hole and Unbound as Linux packages are and what they do. Further, I am not a DNSSEC or DNS over HTTPS or DNS over TLS “profi,” so I cannot go into too much detail on these concepts, but will do my best. Please correct me via the contact form if I have misstated anything, or if I happen to just be wrong as shit.
Step 1: Get your Raspberry Pi built ready to power on
- This is straightforward. Buy a Pi, a case, a power supply (phone charger works), a micro SC card and get everything all put together, but keep the micro SD card out until after the next step
Step 2: Install Raspbian OS (Might be Optional)
- First off, some Raspberry Pi’s come out of the box with Raspbian already installed. If that is the case for you, please skip to Step 3, but be sure that SSH is enabled in your pre-installed version of Raspbian
- If you DO need to install Raspbian, the good news is that it is super easy, BUT there are important options to pay attention to during the installation
- Connect your micro SD card to your “setup” device and be prepared to erase it and write to it
- Go to the Raspberry Pi site and download their installer for your setup device of choice
- I run Windows, so I went with Windows, and ran the imager_xxx.exe, which will install the Raspbian imaging program for overwriting your micro SD card
- Run the now installed imager
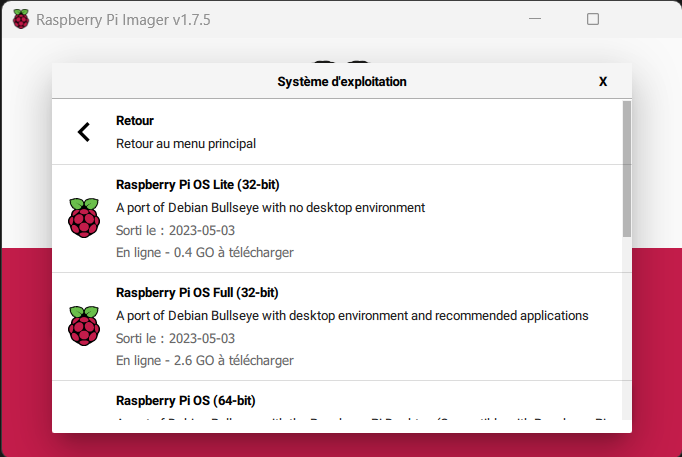
- The default option will install Raspbian with a full Debian-based desktop environment, but you do not need this amount of overhead for this project (feel free to keep the desktop UI if you are going to use the Raspberry Pi for other purposes)
- I do not need the desktop so under “Operating System,” I chose “Raspberry Pi OS (other)” and then “Raspberry Pi Lite (32-bit)”
- STOP! WAIT! I know that you want to hit “Continue” or “Go” but here is the trick as described above
- SSH is deactivated on Raspbian OS by default for security reasons, but you need it, and you need an admin user to log into the Pi per SSH
- Click the little gear in the lower left corner of the imager’s window
- Configure the settings here as you see fit, but definitely turn on SSH and create a user (which will be admin by default, so KEEP THESE CREDENTIALS SAFE) and maybe deactivate the Wi-Fi radio as you don’t need because you bought a Pi with an Ethernet port, right? Right?!?! Also, configuring the timezone here makes sense as well
- Now the imager will download the necessary Raspbian OS files, configure the above settings, and write them to your micro SD card, easy-peasy
- Once complete, you can slide that SD card into the slot on the Raspberry Pi and start it up
Step 5: SSH into your new Raspbian installation
- You are now ready to connect to the Raspberry Pi via SSH (Putty or the built-in Windows SSH client or normal Linux SSH)
- Make sure the Pi is connected per Ethernet to your router, modem or DHCP server of any kind, so that it receives an IP address
- Here is where the “headless” (setup without a monitor/keyboard), is a bit tricky as you need to know what IP address your Pi has been assigned by the router / DHCP server, but I will assume you know enough about networking to figure this out via your router / DHCP server’s admin portal
- Obviously, please do not expose your Raspberry Pi and future DNS server to the internet! This is why SSH is now disabled by default on Raspbian, because too many folks were exposing port 22 to the web! Do not be this guy!
- Now that you have the IP, log into your Raspberry Pi per SSH over port 22 and use the username and password that you created during the imaging process (if you failed to create a new admin user, the default for Raspbian is username: pi and password: raspberry (all lowercase and remember that case matters in Linux land!))
Step 6: install Pi-Hole
- First you should make sure that Raspbian is 100% up-to-date as the imager does not necessarily provide the bleeding edge of Debian updates, so run this command:
sudo apt update && sudo apt upgrade -ysudo(run as admin) will of course ask for your password, which is the admin password you configured during imaging
- For the next step the good news is that this step is super easy as the crew at pi-hole.net have made a bash script that cares of everything for us
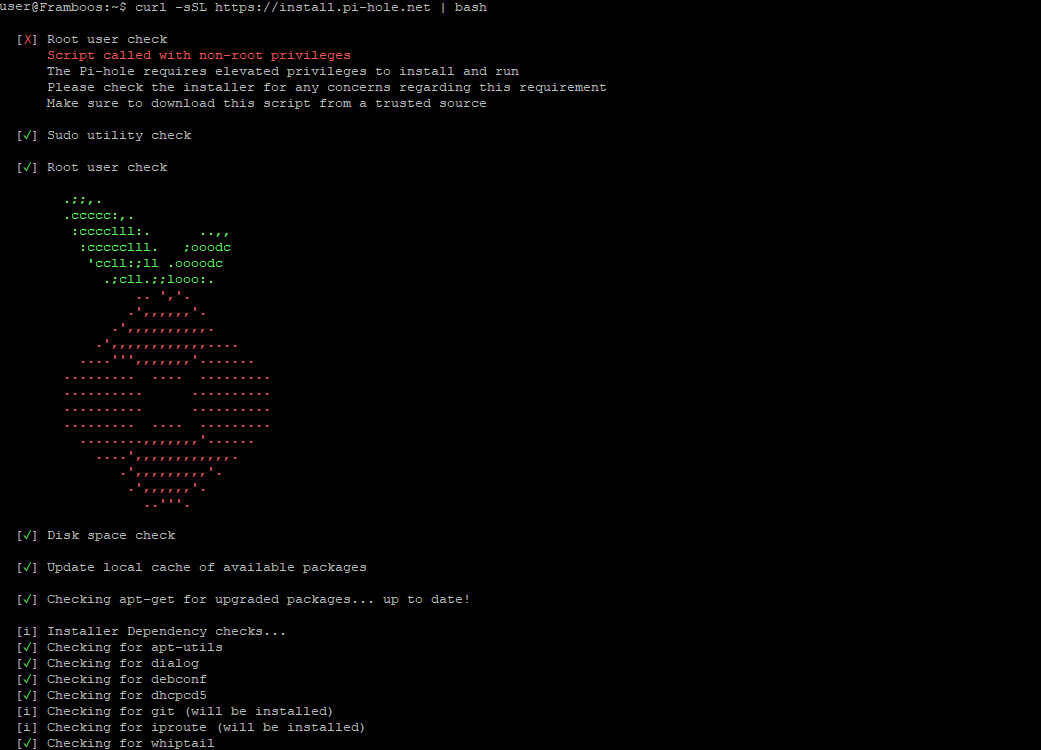
- Just run the command:
curl -sSL https://install.pi-hole.net | bash- FYI one is not supposed to pipe random scripts and URLs to bash, but in this case, I promise that it is safe (do not trust me and instead click the link above and read pi-hole’s GitHub page)
- Now is a good time to grab a coffee, as the script will download and install a bunch of services, update Raspbian, and generally get everything set up for you
Step 6: Initial Configuration of the Pi-Hole service
- Once all the services are downloaded and installed by the script above, you will be presented with some initial configuration screens: here is a more detailed explanation of these settings with screenshots if you are interested
- You can essentially skip or simply accept the defaults for all these screens except three
- First screen, click OK
- The second screen “Initiating network interface” tells you that your new DNS server, needs a static IP address; you will get there
- On the third screen, “Select Upstream DNS Provider,” I recommend using OpenDNS, since it is an open-source project, supports DNSSEC (which you will also be configuring later), and this setting does not matter too much for your purposes as you will be installing Unbound, which will reduce the number of DNS requests you send upstream by a massive margin, thus protecting your privacy
- Screens 4-8, ok, ok, ok, ok… (pick the default “StevenBlack’s Unified Host List” as your block list)
- STOP WAIT IMPORTANT: Finally on screen number 9, “Installation complete,” you are given the URL of the admin web-interface, which is the Pi’s IP + /admin/ and you are given a randomly generated password to said admin web-interface that is NOT the admin password you configured during imaging! Record this password, and yes it has no username!
- You can of course change this web-interface password in the terminal with the command:
pihole -a -p
- You can of course change this web-interface password in the terminal with the command:
- Ok done! You now have an ad-blocking DNS server sitting at an IP on your network. Nice!
Step 7: Set a static IP address for your Pi-Hole/DNS Server
- As recommended by Pi-Hole during the installation, you need to give the Raspberry Pi a static IP
- Still in the SSH / terminal session, run the following command to open the network configuration file for Raspbian:
sudo nano -w /etc/dhcpcd.conf- I assume you know how to edit a file in nano?
- You need to “uncomment” out the lines for IPv4 and edit them to fit to your network and your desired static IP
- Find the section of the file that looks like this:
# Example static IP configuration:
# interface eth0
# static ip_address=192.168.178.58/24
# static ip6_address=fd51:42f8:aede:d92e::ff/64
# static routers=192.168.178.1
# static domain_name_servers=192.168.178.1 8.8.8.8- And make it look like this, then save (CTRL+O, CTRL+X):
# Example static IP configuration:
 interface eth0
 static ip_address=YOUR_DESIRED_STATIC_IP_FOR_PIHOLE/24
# static ip6_address=fd51:42f8:adee:d92e::ff/64
 static routers=YOUR_ROUTER_OR_GATEWAY_IP
static domain_name_servers=YOUR_DESIRED_STATIC_IP_FOR_PIHOLE- After saving the new configuration, you will need to restart the Raspberry Pi for the settings to take effect AND you need to set this IP to static on your DHCP server, router, or gateway as well
- To restart the Pi, run this command:
sudo reboot - Note: you will also need to use this static IP for future Putty / SSH purposes, so document it!
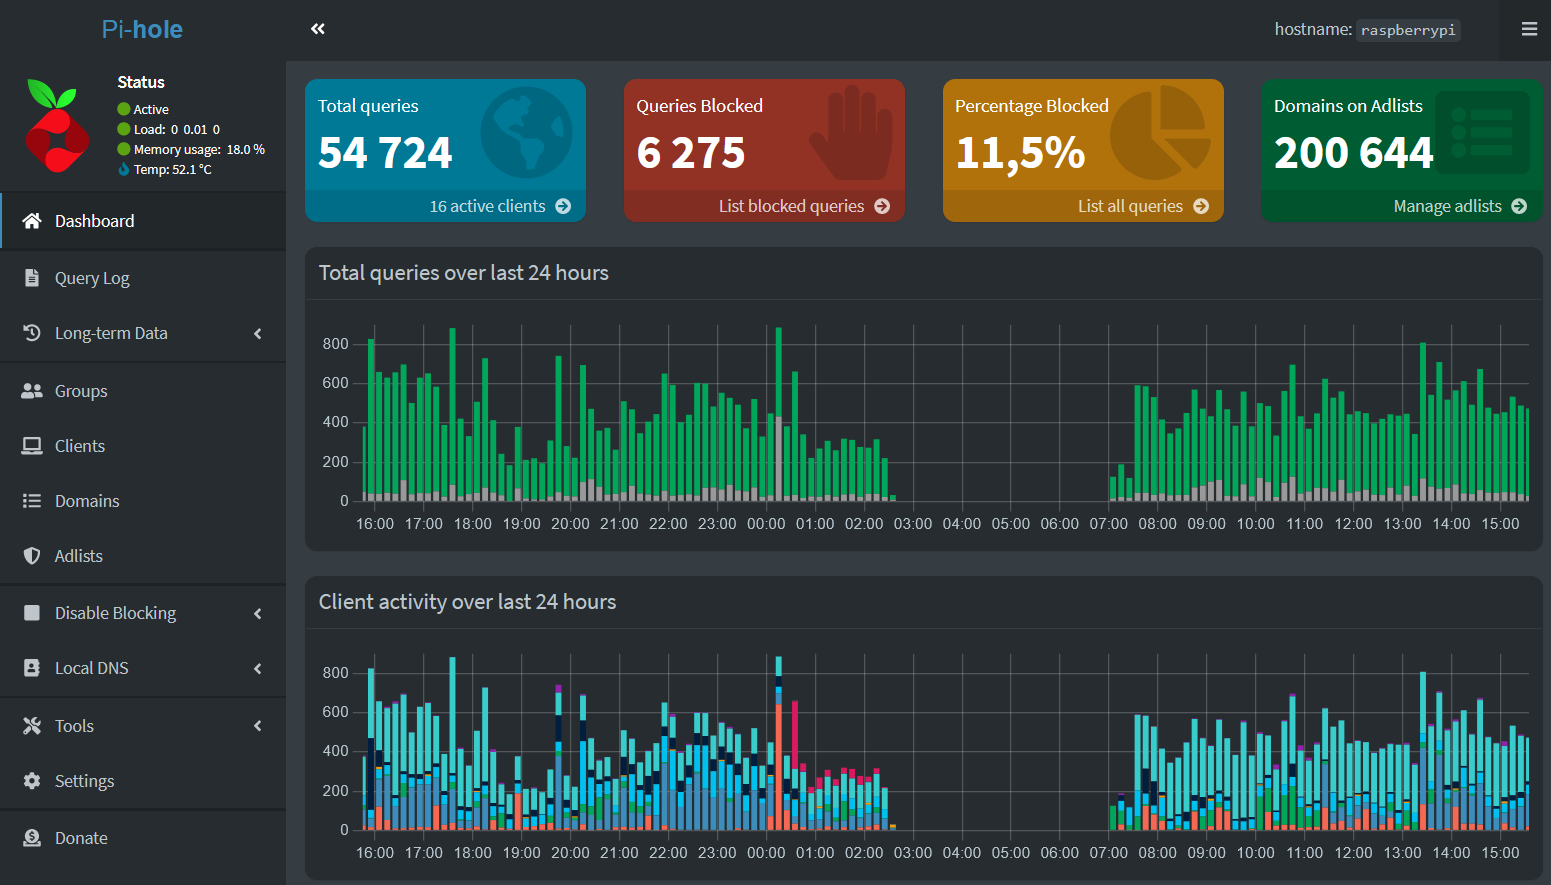
Step 8: Logging into the Web-interface and configuring Block-lists
- You can now log into the Pi-Hole web-interface; assuming your Raspberry Pi has a static IP as configured above of 192.168.178.250, navigate to http://192.168.178.250/admin/ (note the lack of HTTPS, as you will be accessing this device only from your local network, and it will not be reachable by any inbound ports from the internet, right? Right?!?)
- You will get a certificate error as you are skipping the set-up of a TLS certificate and the whole HTTPS business, so just “accept” the risk in your browser and log into your Pi-Hole web-interface
- I won’t go through each and every page here, but will highlight the important stuff, but here is the documentation from Pi-Hole themselves
- First an important page is the “Adlists” page, as here you can subscribe to more ad blocking and other types of blocking categories, which are all nicely maintained for free by volunteers
- For example, I set one of these up for my brother who has four kids, and you blocked ads using the default list from Steven Black, as you did during the set-up phase, but I also added a porno block list as well for his network to protect his kids
- Here are some more block-lists to review and subscribe to in Pi-Hole and Google can also be your friend here, so give it a look
- The second important page is “Domains,” where you can safe-list or block-list specific sites
- I for instance have little shopping aggregator sites whitelist as sometimes I want the ad/tracking links for some sites to work, but generally I want to NOT be tracked
- I have safe-listed:
(\.|^)googleadservices\.com$for example, so that Google Shopping links work - I leave it to you to play around with the domains here, as suits your purposes
- Finally, under “Tools → Update Gravity” you can manually update the block-lists to which you are subscribed, but this update also takes place automatically on Sundays (your timezone) between 3 :00 AM and 5:00 AM, so manual updates are not required
Step 9: Set up Unbound
- Now you are going to install Unbound, but what is Unbound and why do you care
- Again, I am not the super networking expert, so please refer to the Unbound documentation above for more info. Essentially, Unbound will turn your Pi-Hole installation into a RECURSIVE DNS server, meaning that Unbound forces your Pi-Hole DNS server to resolve the full chain of addresses, when it performs a look-up. Basically this means that Pi-Hole keeps all the look-ups as local as possible and doesn’t query upstream DNS provides unless it MUST, hence why the choice of upstream DNS server was not so important before. By not constantly querying Google or ISP’s upstream DNS servers, you prevent these third party services from building a profile of your look-ups/searches, and furthermore your local device’s DNS queries all stay internal between your device and the Pi-Hole installation, which also adds to security as the fall back to non-DNSSEC queries are over port 53 UDP in plaintext and potentially capable of being intercepted
- Regardless, just follow the docs/guide found above to get Unbound up and running
- There are essentially 3 steps:
- Install Unbound per SSH / the terminal (remember to SSH into the new static IP)
- Edit the pi-hole.conf file with nano, as per the docs
- Update the max packet size for DNSSEC queries (I’ll just take the author’s word for it, that this is necessary) 😉
- Finally, back in the Pi-Hole web-interface, change your upstream DNS provider from OpenDNS to a recursive look-up by setting the “Custom 1 (IPv4)” server to
127.0.0.0#5335"
- Again the Unbound docs spell it all out and I stopped at the “Add logging to Unbound” section
- There are essentially 3 steps:
Step 10: Set the Pi to be your network’s DNS server and test (LAST STEP!)
- Ok last step! Yeah! I am also assuming you know how to change your router’s DNS server
- Point your router / gateway to assign the Pi-Hole as it’s, and it’s DHCP clients’ DNS server
- Restart your router / gateway so that the DHCP server assigns new addresses to all your clients
- Now time to test:
- The commands:
ipconfig /flushdnsandnslookupare your friends in Windows world - The command:
digis your friend on Linux and OS X, while being sure to flush your local DNS cache is super helpful and important during the testing phase here, so here is some help with that for Linux and OS X - Here are some good test examples from the Unbound docs that you can run from your SSH / terminal session on the Pi
dig fail01.dnssec.works @127.0.0.1 -p 5335dig dnssec.works @127.0.0.1 -p 5335
- You can further test that DNSSEC is working with this site
- The commands:
- TROUBLESHOOTING TIP:
- Be sure to test against sites that you do not normally visit:
nslookup whitehouse.govfor example, less something be cached at the router level perhaps - Furthermore and this happened to me, as my brother had a network with multiple subnets: If DNS is resolving correctly for the Raspberry Pi in the terminal, but not on your devices / clients, then check the settings under “Settings → DNS”
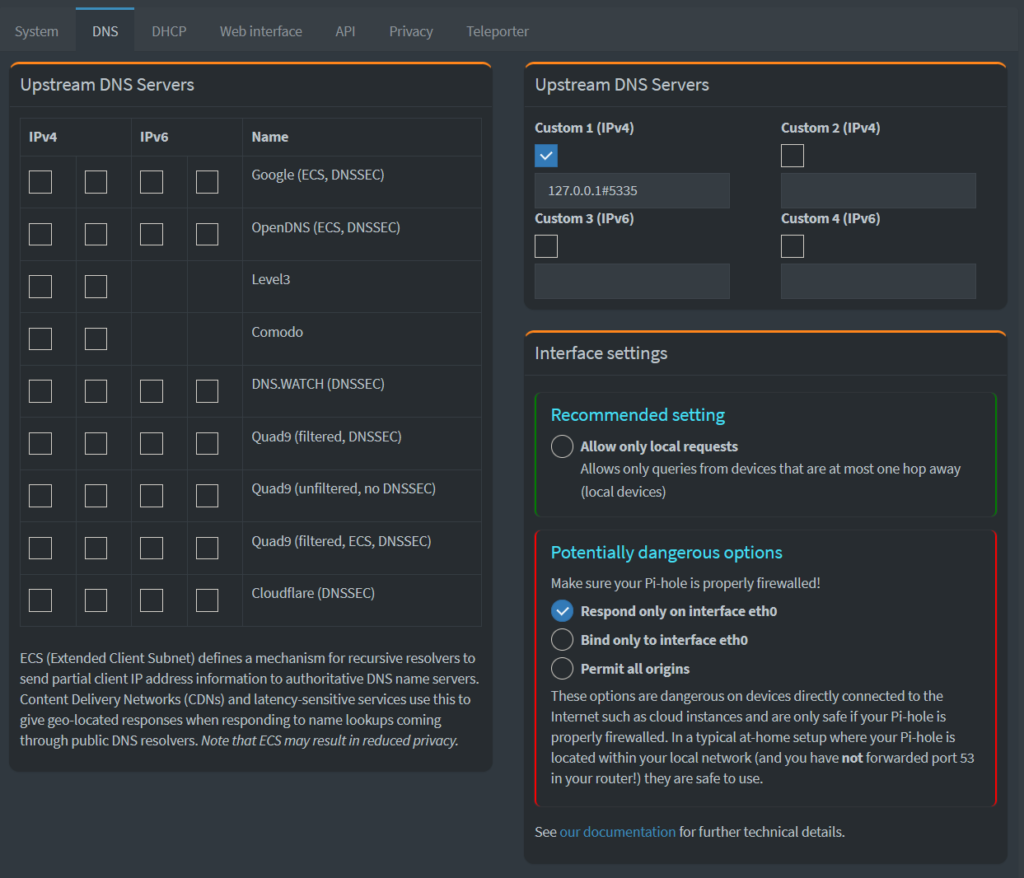
- Being sure that your Raspberry Pi is properly fire-walled, see if your clients and devices can get an answer from Pi-Hole if you “loosen” these settings a bit
Ok, that is it! If your devices are receiving lookup responses from “pi.hole” as their server, then you are up and running. Open some weather or news sites up and see if you get spammed with ads. Check for the other types of sites that you may have blocked. If you cannot reach them (Site not found / 404) then it is working as intended.
Final Notes / Caveats:
Congratulations if you have come this far and everything is working. It’s complicated, and you got it done and hopefully learned something along the way. Please reach out to me via the contact form if I can help at all. I mentioned caveats above, as there are few ways that ads will still squeak past Pi-Hole, and sometimes you may even want to allow them.
First, please understand the limitations of DNS filtering. If the ad is being served to you from a site NOT on one of the block lists to which you have subscribed, then it will be displayed by the device. Pi-Hole cannot block what it does not know about, but further and smartly of the large content providers of the world (Youtube, Twitch, Amazon Prime, etc…), if ads are being served to from the source of the content that you want to consume, then Pi-Hole cannot block them without blocking said content. What does this mean: if watch a YouTube video, and you get a video ad from goodcontent.youtube.com, then Pi-Hole will not block ANY content coming from *.youtube.com, as you DO want to see the rest of the real YouTube video. Essentially, the big tech companies are smart enough to serve you ads from their main domains rather than from goodcontent.youtube.adspammer.com, which could be easily blocked.
Second, there are times when maybe you want to skip the ad or content filtering, and here you have several options. You can add the sites in question to the safe-list in the Pi-Hole web-interface, like you did with Google Shopping, or you can change your device’s DNS server either manually in the settings or by activating a VPN client, which often provides a secure tunnel to the VPN service’s DNS servers. I use TorGuard for instance, and they have an ad-blocking DNS provider for their VPN service or a commercial one, like 8.8.8.8. It is up to you. Good luck!